
Welcome to a groundbreaking fusion where the cutting-edge world of Virtual Reality collides with the exhilarating realm of console gaming. In this latest blog post, we’re delving into uncharted territories, exploring how the Meta Quest 3, a powerhouse of VR technology, can transform your gaming experience with the PlayStation 5, along with other beloved gaming consoles like the PS4, Nintendo Switch, and PC.
Our video covers this concept off from start to finish, with this guide aimed at providing further information if required. View our video below:
The Meta Quest 3 and PlayStation 5: A Symphony of Technology
The Meta Quest 3, renowned for its standalone VR capabilities, now unlocks new potentials as it interfaces with the PlayStation 5. This isn’t just about playing games; it’s about redefining how we experience them. Imagine donning your VR headset and stepping into the worlds of your favorite PS5 titles, experiencing them in a way that a regular TV screen could never offer. But how does this integration work? What does it take to merge two seemingly different technologies into a seamless gaming experience?
A Journey of Discovery
In this post, we will embark on a detailed journey, uncovering the steps and intricacies involved in connecting the Meta Quest 3 to various gaming consoles, with a special spotlight on the PlayStation 5. From the nuances of hardware setups to the essentials of software configurations, we’ll cover everything you need to know to transform your VR headset into a versatile portal for your console gaming adventures.
Beyond Gaming: A Window into Future Possibilities
This exploration is more than just a guide; it’s a glimpse into the future of gaming and technology. As we walk through the process of integrating the Meta Quest 3 with these popular gaming systems, we’ll also ponder the implications of such advancements. How will this fusion of VR and traditional gaming shape the future of entertainment? What other experiences could this technology unlock?
Stay tuned as we unravel the potential of this technological synergy, and join us in witnessing the evolution of gaming into a new dimension. Whether you’re a hardcore gamer, a VR enthusiast, or simply intrigued by the latest tech trends, this post promises to offer you insights, tips, and a peek into what the future holds.
What Do you Need to Make this Work!?
As we cover in our video there are certain elements required through the flow of the connectivity:
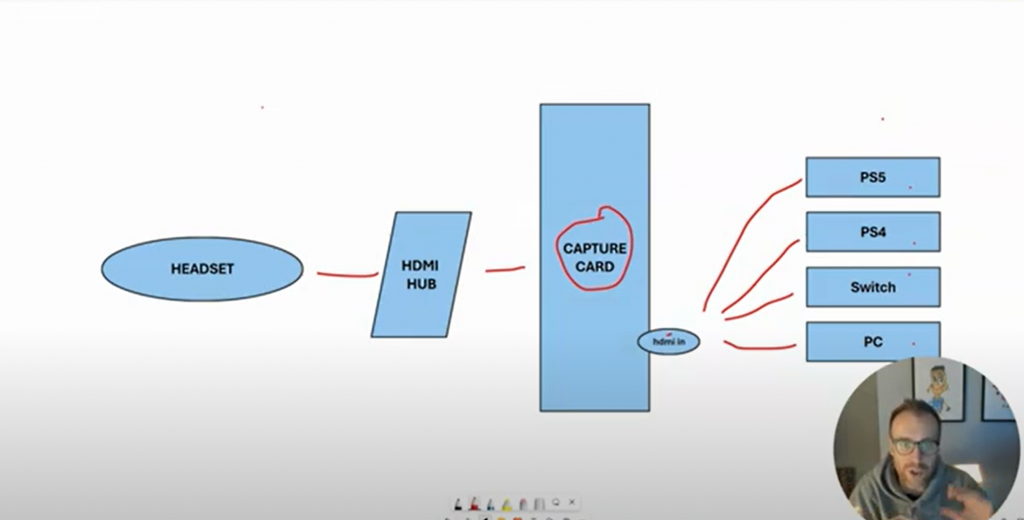
Output Device
This concept is possible, in theory, with any device that can output HDMI. So any games console should be possible, such as:
- Playstation 5
- Playstation 4
- Playstation 3
- Nintendo Switch
- Xbox Series S
- Xbox Series X
- Xbox One
- Laptop
- Desktop PC
Capture Card
Once you’ve decided which device you are going to output from, you need to have a capture card. There are multiple options out there, but the ones we have tested with are:
- Elgato CamLink 4K – https://amzn.to/48C4QdO
- Elgato HD60X – https://amzn.to/41Xk8aN
The HDMI cable from your Output Device plugs into the HDMI Input port of the Capture Card.
USB Hub
Rather than connecting directly from the capture card into the Meta Quest headset, we have found the best way to connect is via a USB hub. The USB hub plugs into the Meta Quest headset, with the output from the capture card going into the USB hub. This completed the end to end connectivity of the hardware. The hubs we tested with are below, but others will work:
- USB-C Hub (Option 1) – https://amzn.to/48Svdfq
- USB-C Hub (Option 2) – https://amzn.to/3vDFuOp
- Huawei USB Hub – https://amzn.to/47FRj3A
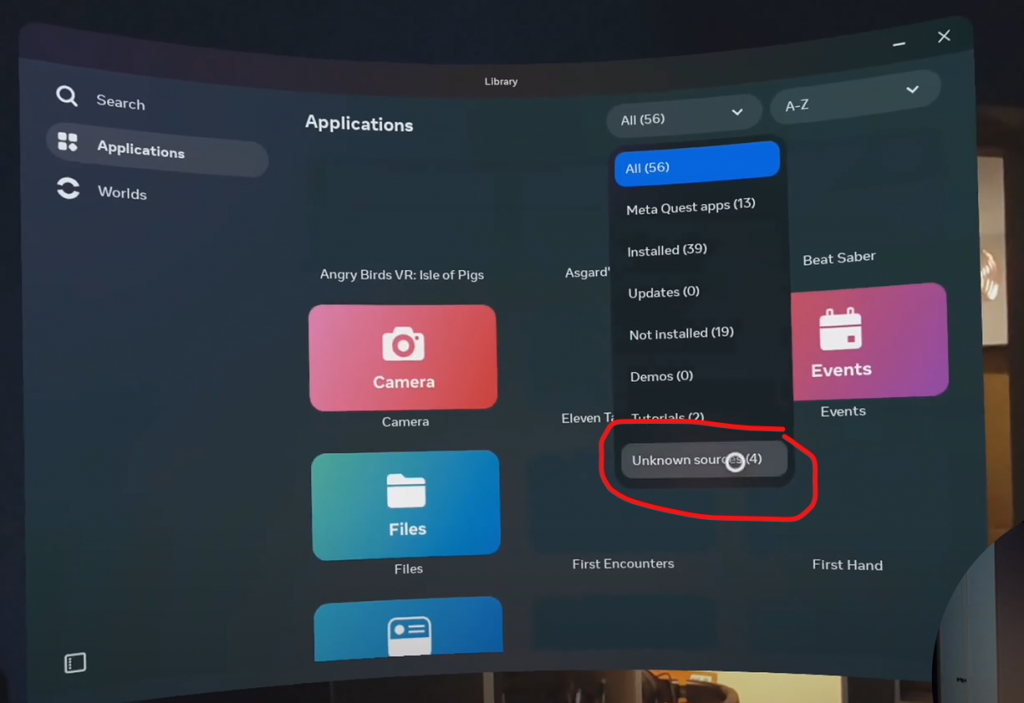
Side-Loading Applications
Once you have the hardware part sorted, you need an application on your headset to display the output from your console. This can be done by side-loading and application called “USB Camera” onto your Meta Quest. This is done by using a service called “SideQuest”. This facilitates a number of different capabilities with the side loading of APK files onto your headset being one of them.
We don’t cover the details in this guide but there’s a video here that details that end to end. https://youtu.be/1MOMI5rda9U?si=4Afs0sgg145acnRD Its a very easy process, but an important one we need for this to work.
Once we have SideQuest sorted and developer access confirmed, we can side load the ‘USB Camera’ application onto the headset. The APK file can be downloaded here – USB Camera 10.9.2 (Android 11+) APK Download by 沈垚 / ShenYao China – APKMirror
Side-loading is done by the click of a couple of icons from within SideQuest

- Click on the above icon.
- Find the downloaded APK and click open.
- Thats it! It will install on your headset
With everything plugged in you can head over to your headset.
Find and Open the ‘USB Camera’ Application
Due to the application being side-loaded, you need hunt down the application. From the application menu there is a drop-down menu. Click that and choose “Unknown sources”.
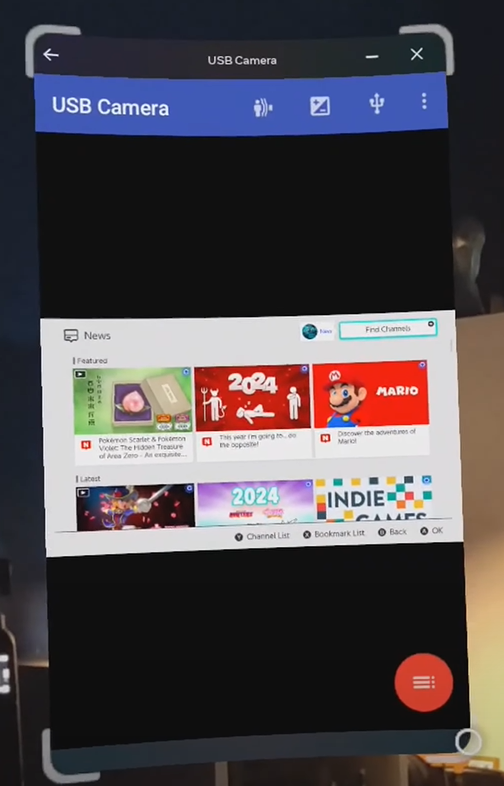
Open the ‘USB Camera’ application and you should be greeted with the output from your console. You will notice the scaling will be off to start with. Hover over one of the corners and drag the window to the size/dimensions you would like:
Done & Dusted
That’s it, all done!! You can now swap and change between different consoles, trying out anything that will output via HDMI!!
I have tried to cover things off the best I can in this guide, but tried not to go into too much detail. However, if there’s anything you would like to know, or have further questions, drop them on this post or over on the YouTube video!